GitLab is a common alternative to GitHub, and you can publish Quarto documents that are hosted via GitLab fairly easily. This blog post documents how to do it.
Author
Nicola Rennie
Published
May 18, 2026
Quarto is a publishing system that lets you write documents that combine text and code in one place. There are a wide variety of ways to publish documents, presentations, and websites created using Quarto. GitHub is probably the most widely used, and there are many existing blog posts (including the official documentation) with plenty of information about how to deploy Quarto documents with GitHub. However, I find myself using GitLab more and more these days. I think it has nicer ways to organise repositories and projects, and you can deploy private websites out of the box! But the information for deploying Quarto projects via GitLab is a bit more sparse. In fact, GitLab isn’t even included in the list of places you can publish documents on the official Quarto documentation! But you very much can, and the aim of this blog post is to document how to do it (even if only for future me).
Note
This blog post assumes you already know a little bit about Quarto and can render documents; and are able to add things to a Git repository.
GitLab
GitLab is a web-based platform for hosting Git repositories that also provides tools for collaboration, CI/CD, project management, and software deployment. It’s a common alternative to GitHub. GitLab Pages is a feature of GitLab that lets you host static websites (like those created with Quarto) directly from a Git repository using automated deployments.
GitLab CI/CD is a built-in automation system in GitLab that automatically builds, tests, and deploys code whenever changes are pushed to a repository. For example, re-publishing your website when you make some changes to a Quarto document. If you’re (formerly) a GitHub user, the GitLab CI/CD is the GitLab equivalent of GitHub Actions.
Quarto document
Before we demonstrate how to deploy a Quarto document, we’re going to need an example Quarto document. Here’s a simple Quarto document that creates a plot of the Palmer Penguins data. The document has a title, and the code and warnings are hidden. It doesn’t really matter what’s in the Quarto document for the purposes of this blog post, as long as we have something that we can render.
index.qmd
---title:"Palmer Penguins: Body Mass vs Flipper Length"execute:echo:falsewarning:false---```{r}# Load the packagelibrary(palmerpenguins)# Create a scatter plotplot(penguins$flipper_length_mm, penguins$body_mass_g, col = c("darkorange","purple","cyan4")[as.numeric(penguins$species)], pch = c(19, 17, 15)[as.numeric(penguins$species)], cex = 1.2, xlab = "Flipper Length (mm)", ylab = "Body Mass (g)", main = "Gentoo penguins have longer flippers and higher body mass", cex.lab = 1.1, cex.main = 1.3)# Add a subtle gridgrid(col = "grey90", lty = 1)# Add a legendlegend("bottomright", legend = levels(penguins$species), col = c("darkorange","purple","cyan4"), pch = c(19, 17, 15), pt.cex = 1.2, cex = 1.0, bty = "n")```
Note
Although the palmerpenguins data is now available in base R, I’m deliberately using the package version here to later show the process of installing any required packages in GitLab CI/CD.
You run code and render, GitLab deploys
Let’s start with the simplest approach. You have a Quarto document, and you’ve rendered it on your laptop. You likely have your output in the form of some HTML files. All you really want to do is share those online, so that people can read your nicely rendered document.
Quarto projects
Although you can deploy an individual Quarto document, it’s much easier to deploy documents as projects. In the same directory as our Quarto document, we add _quarto.yml file to make it into a Quarto project before re-rendering.
_quarto.yml
project:output-dir: public
The default directory name for project outputs is _site but I strongly recommend you override that and put them into a folder called public. This is because, in GitLab, public is a special folder that it looks for when deploying to GitLab Pages.
Using projects is also a good way to keep your work more organised, even if the project contains only a single Quarto file, since all of the outputs go into one directory instead of being mixed in with source files.
Tip
If you’re deploying via GitHub Pages, I’d also recommend using a Quarto project with the output directory set to docs instead.
Push the files in the public folder to your GitLab repository (either with or without the source files in the root directory).
GitLab CI/CD
Unlike when deploying to GitHub Pages, there’s no need to run any deployment commands in a terminal first. GitLab takes care of it all. All you need to do is create a file called .gitlab-ci.yml in the root directory of your repository (not in the public folder). One of the benefits of this is that you actually don’t need to run anything locally, and you can do the whole thing from the GitLab web interface if you need to.
When we’ve already rendered and pushed the output files ourselves, the CI/CD file is fairly simple. We just need to tell GitLab to copy the files in the public folder and put them on GitLab Pages. That file looks like this:
.gitlab-ci.yml
pages:stage: deployscript:- echo 'Publishing existing public folder'artifacts:paths:- publiconly:- main
Commit and push that file to the GitLab repository, and that’s it!
Page settings
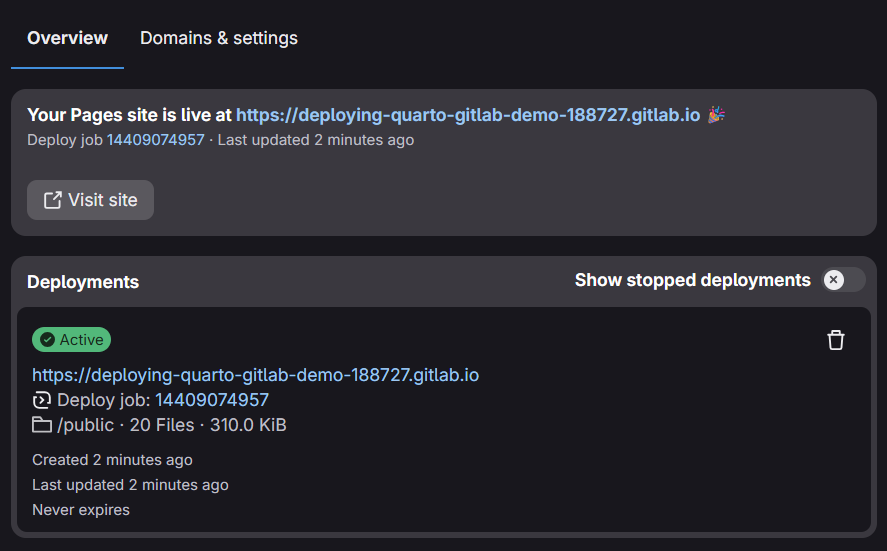
One thing I think is a little bit less clear in GitLab compared to GitLab is the address of where your site has been published. In the web interface to GitLab, go to the menu on the left hand side called Deploy, and then click Pages. This will bring to the GitLab Pages interface, and will show you the URL it’s deployed at.
Depending on your settings, you may notice that the URL isn’t very nice. GitLab can use unique domains (which is often a useful feature), but looks less nice when sharing publicly. The default URL is often of the form the repository name suffixed with some random numbers, then gitlab.io. To change this, click on Domains & settings, and then untick Use unique domain before saving the changes. Your Quarto document will then de deployed to username.gitlab.io/repo. Once deployed, you will also find the link to your site on the right hand menu of the GitLab repository, under GitLab Pages.
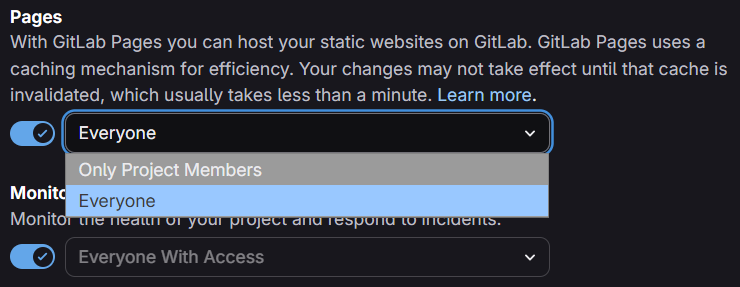
One of the nice things about GitLab is that even the free version allows you to publish public sites, even when the source code is public. You can control the access to the site, by going to Settings -> General -> Visibility, project features, permissions, on the left hand menu in the repository. Scroll down until you see the Pages section, where you can then choose whether everyone or only (logged in) project members can access the site. Make sure you scroll down a little bit further to save changes!
You run code, GitLab renders and deploys
One of the really nice features of Quarto is the ability to freeze computations, i.e., choose when (if ever) to re-render documents that contain code blocks. When documents are executed with freeze, the computational outputs get stored in a directory called _freeze. If you look in that folder, you’ll likely see things like static image files of your plots. You can read more about the freeze option in the Quarto documentation.
This is a really useful feature if you have lots of collaborators, lots independent computations over a long period of time (e.g. a blog), or long-running code that you don’t want to re-render every time you’re just updating some text.
You should commit and push the contents of the _freeze directory, alongside your source files to GitLab. If you’ve rendered your documents locally, you want to make sure you don’t add the output to GitLab. You can do this by adding public/* to your .gitignore file.
Tip
You may also be working on Quarto projects that do not contain any computational code blocks, and instead contain only Markdown content. You can follow the same procedure here. You just won’t have _freeze directory to add!
As before, we also add a .gitlab-ci.yml which follows a similar structure to before but has a few extra elements. We start by specifying an image. Here, an image refers to a Docker image which defines the environment in which jobs are executed. We use an image that provides the latest version of Quarto.
Our file then includes a script element which runs quarto render. This is exactly what you would do in a local terminal to render your Quarto project. Optionally, you can add in some rules about when the CI/CD pipeline is run. Here, it runs any time there is a commit to the main branch, but also contains a manual trigger. This means you can go in and refresh the deployment manually whenever you need to.
Finally, you may have a project where you want GitLab to render the entire output, including any code, as well as deploying it. This is a good approach for checking your code actually works in a different environment. If you need to fix a typo in your presentation just before you deliver it, this also means you can do it from your phone!
This approach does means that we need to install both Quarto and R(/Python/Julia) and any required R(/Python/Julia) packages before we render the document. For R, our .gitlab-ci.yml file starts slightly differently this time. We start by using a Rocker image. This provides a ready-made Docker image for R. We then manually download and install Quarto, before loading any required packages. We also cache the installation of R packages to save time on future runs of the deployment. The remainder of the script is the same as the previous version.
For installing R packages, you may wish to use renv to control the version of R packages that are installed. Otherwise, the most recent version is installed (which may or may not be what you want!)
A couple of other gotchas:
For some R packages, you might need to install system dependencies, e.g., for spatial packages. You can do this in the same section as you install Quarto, i.e., before you install any R packages. You may instead wish to install a different image. See the list of images with popular software and libraries pre-installed, including ones for geospatial analysis, Shiny, and tidyverse installation.
If you are installing packages from GitHub (rather than from CRAN), you will need to add a GitHub access token as an environment variable in GitLab. You don’t need this when installing GitHub packages in a GitHub Actions workflow (because you’re essentially already authenticated), but you do for GitLab CI/CD.